【Cs】Google Drive 自動上傳檔案並共享
文前言
為甚麼會用到兩個 AI 5 6 呢...
簡單來說就是因為問題太多了,導致兩隻先後被問爆,只能換一個問了...
為甚麼會有這篇文產生呢
原因是產出某檔案後需要自動寄信
但有時寄信會因為附件檔案過大導致改手動寄
所以只好手動把檔案上傳到 GOOGLE DRIVE 再設定共享連結
(知道該連結的所有人都可以檢視檔案)
再複製連結放在信內寄出。
但身為工程師,捷徑就是重點 (???
所以必須有個自動上傳檔案對不!!
寫這篇的目的是以防未來 N 年後有需要結果因為當時只留程式碼,導致印象不完全,所以...(哭
*** 使用:.NET Framework WebForm
主文
首先來看套件吧
此次需要的是 Google.Apis.Drive.v3
裝這個會一並裝好相依套件。
套件詳細請見此:
- googleapis/google-api-dotnet-client: Google APIs Client Library for .NET
- NuGet Gallery | Google.Apis.Drive.v3 1.69.0.3740
服務帳戶
建立服務帳戶
- 依照下圖,打開服務帳戶建立的入口點
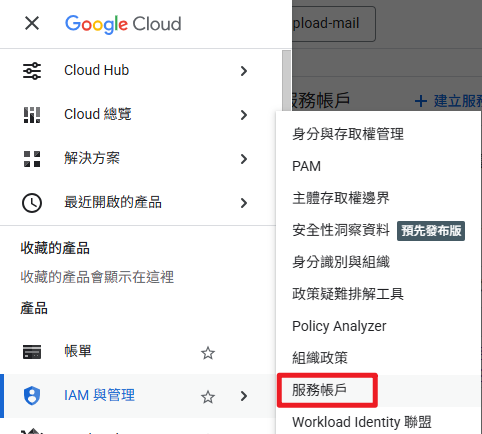
點開後會看到:
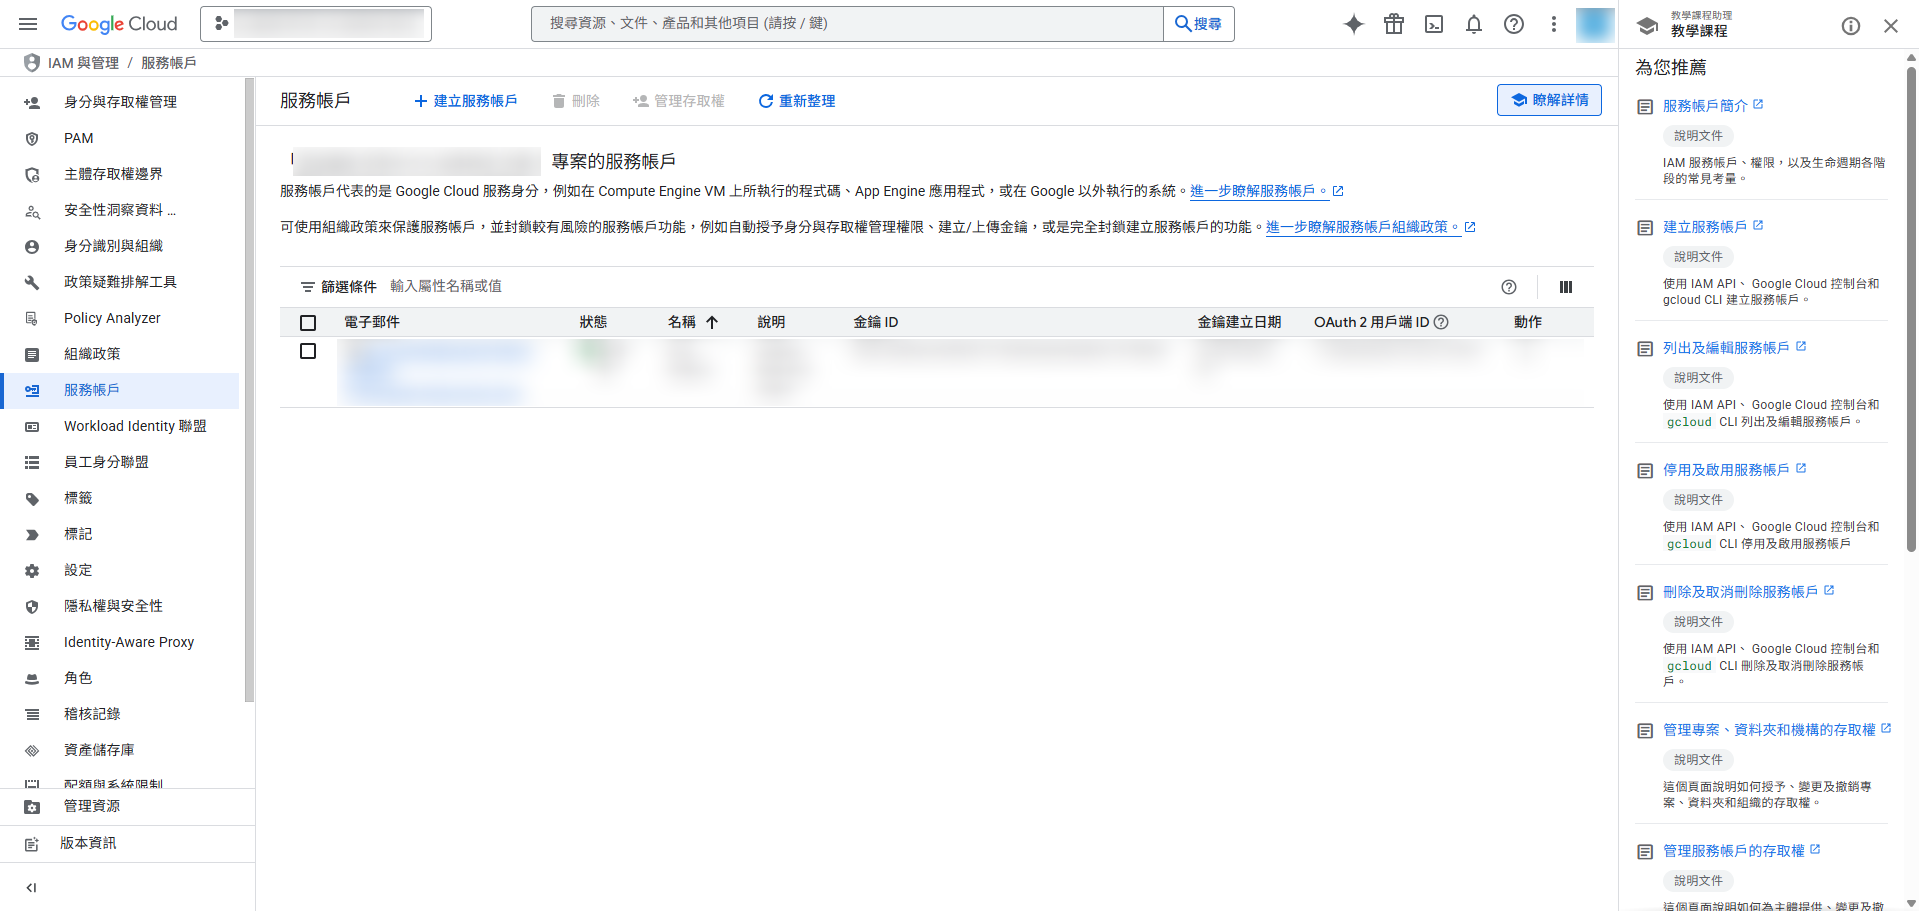
(上圖是因為已經建過帳戶了,所以才有一筆在)
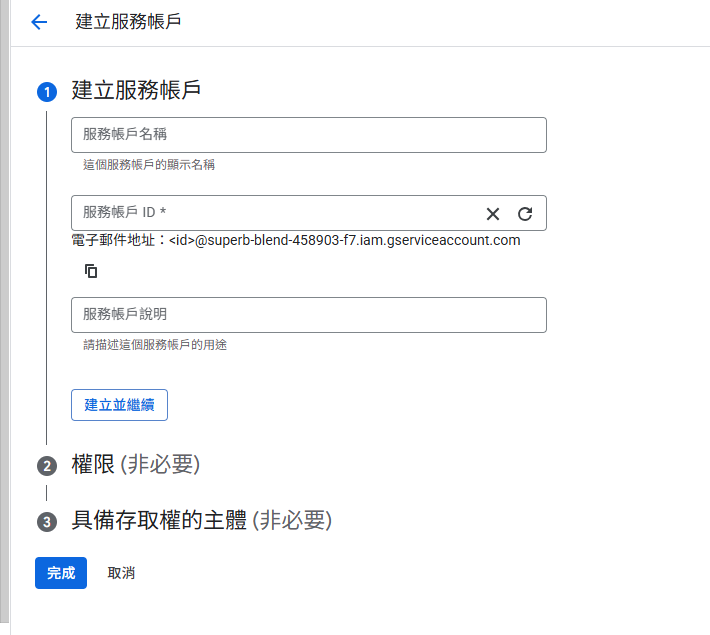
- 點開 [+ 建立服務帳戶]
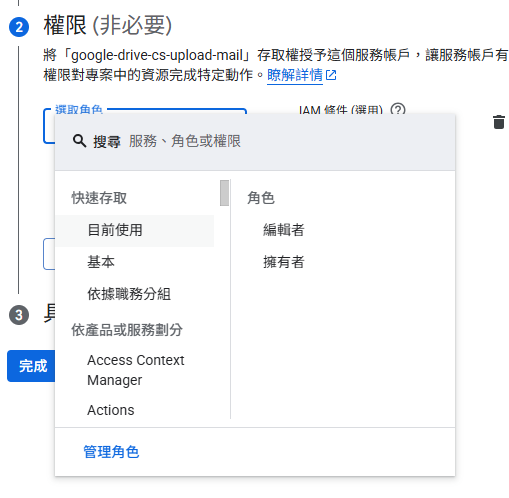
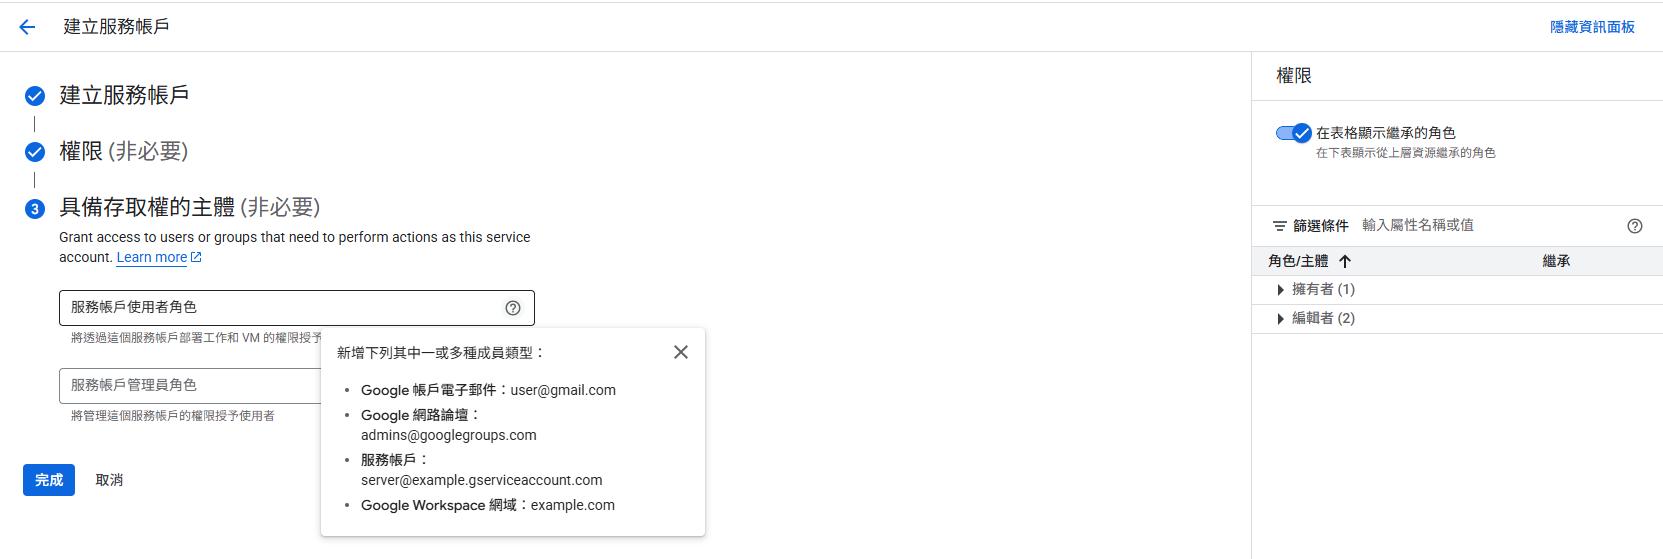
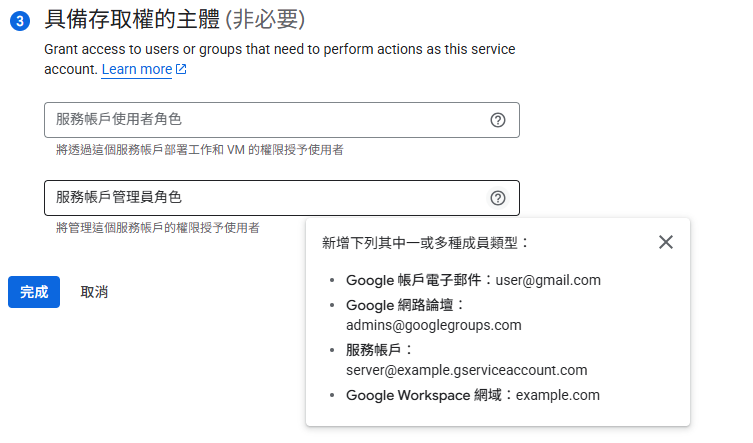
如下3圖,依序填入想要的名稱、ID、說明、權限、可存取主體
-1
-2 權限
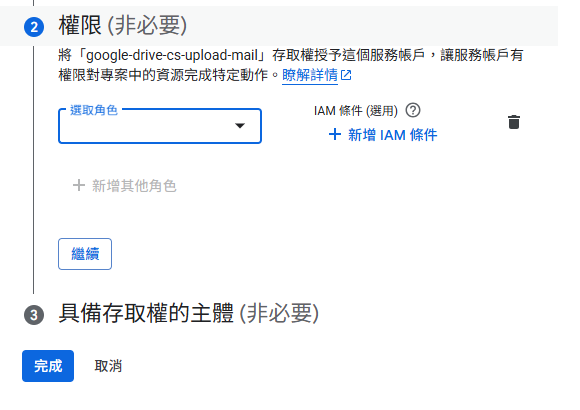
-3 具備存取權的主體
- 點選 [完成]
建立金鑰
建立好後應該如下圖:
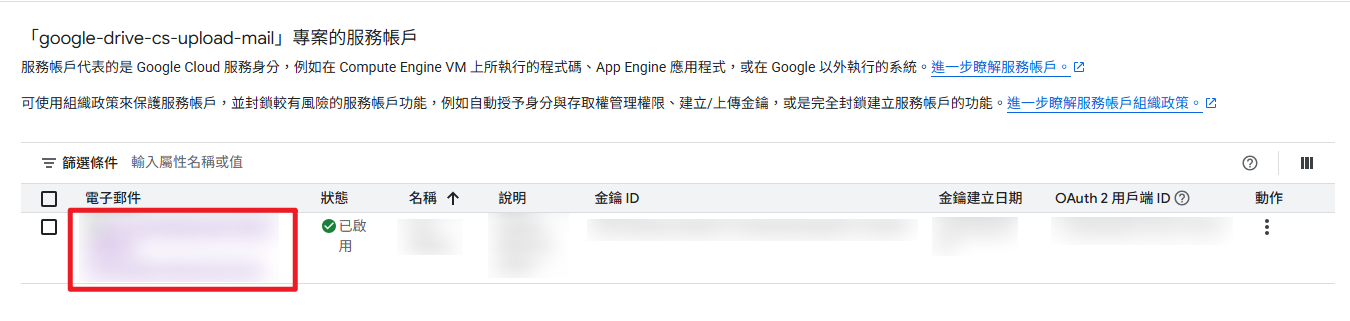
點選紅框進去
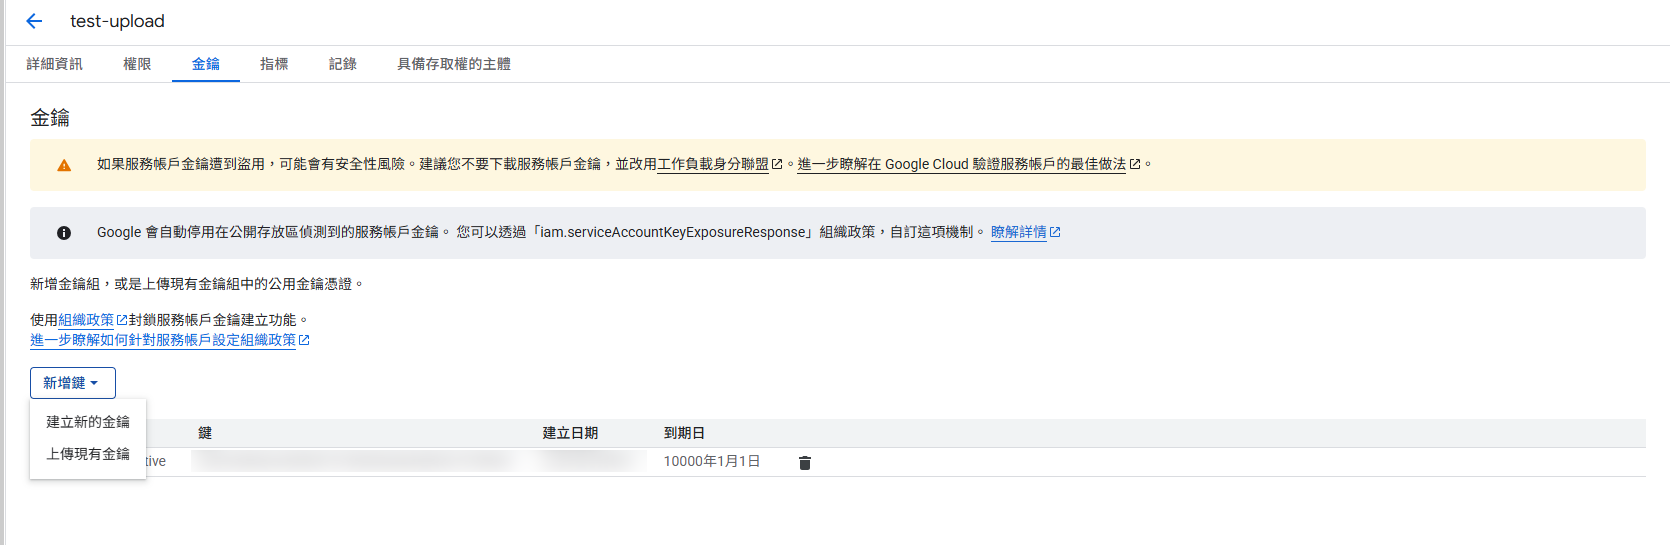
(上圖是已經建立金鑰成功後,才會出現一筆)
點選 [建立新的金鑰]
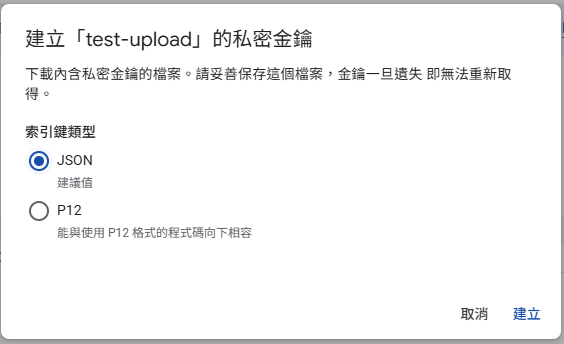
個人都選擇 JSON (因為沒用過 P12)
按下 [建立],就會自動下載 JSON 金鑰了。
金鑰內容可以參考
- Day 17 — Terraform/GCP基礎 — 設定 GCP 服務帳號 (Service Account) - iT 邦幫忙::一起幫忙解決難題,拯救 IT 人的一天
該篇內的 [查看金鑰 key裡面的內容],有詳細解說。
權限設定
接下來請依照 2 設定權限啦!
這裡也是為何本文會出現的其他原因:
- 1 使用的是 v2,改 v3 有些地方需要修改
- 個人只需要用服務帳號,沒有 OAuth 2.0 的需求。此處請依照自己選擇決定。
用服務帳號的原因是個人不需要知道別人的 GOOGLE 資訊 (例如電子郵件之類
只需要簡單的上傳檔案,並共享連結給所有知道連結的人。
若希望自己也可以檢視到究竟經由服務帳號上傳了哪些檔案:
- 自己的 DRIVE 下新增資料夾
- 該資料夾設定與服務帳號共用
(目前尚未找到如何不依靠自己的帳號就能檢視到服務帳號上傳的所有檔案
除了走程式看以外
所以先這樣做。)
一點參數
ref:
- REST Resource: files | Google Drive | Google for Developers
- Return specific fields | Google Drive | Google for Developers
.Fields:
*: 全部顯示- id: 該檔案 id
- name: 該檔案檔名
- webViewLink: 共享後的純檢視用連結
- parents: 該檔案父資料夾 ID
簡易範例
初始化
private DriveService _driveService;

protected void upload_ServerClick(object sender, EventArgs e)
{
    _driveService = GetDriveServiceAsync();

    Upload();
}
取得權限
回傳 DriveService
(原來源:4)
ApplicationName: 請填自己在 CLOUD 中設定的專案名稱
private DriveService GetDriveServiceAsync()
{
    string path = Path.Combine(".../xxx.json");
    // Method 1: 透過 JSON 金鑰檔案來取得
    var cred = GoogleCredential.FromFile(path);

    if (cred.IsCreateScopedRequired)
    {
        cred = cred.CreateScoped(
            DriveService.Scope.Drive  // 完整的 Drive 存取權限
        );
    }

    return new DriveService(new BaseClientService.Initializer
    {
        HttpClientInitializer = cred,
        ApplicationName = "AAA"
    });
}
設定共享權限
// 建立權限物件
Google.Apis.Drive.v3.Data.Permission permission
    = new Google.Apis.Drive.v3.Data.Permission
    {
        Type = "anyone",        // 任何人
        Role = "reader",        // 閱讀者權限
        AllowFileDiscovery = false  // 防止在搜尋中發現檔案
    };

// 應用權限到檔案
var permissionRequest
    = _driveService.Permissions.Create(permission, response.Id);
permissionRequest.SupportsAllDrives = true;
permissionRequest.Execute();
上傳檔案!
*** 注意:
請打開自己想與服務帳號共用的資料夾
看看連結:https://drive.google.com/drive/folders/XXX
那個 XXX 就是要填進去 Parents 的東東
public Google.Apis.Drive.v3.Data.File Upload()
{
    try
    {
        Google.Apis.Drive.v3.Data.File driveFile
            = new Google.Apis.Drive.v3.Data.File
            {
                // 在此設定上傳指定檔名
                Name = file.Name,
                // 指定共用資料夾
                Parents = new List<string> { "XXX" }
            };

        using (var stream = new FileStream(fileSource, FileMode.Open, FileAccess.Read))
        {
            var request = _driveService.Files.Create(driveFile, stream, "(檔案的 MIMETYPE)");
            request.Fields = "*";
            var result = request.Upload();

            if (result.Status == Google.Apis.Upload.UploadStatus.Completed)
            {
                Google.Apis.Drive.v3.Data.File response = request.ResponseBody;

                try
                {
                    // 權限設定完後:取得更新後的檔案資訊(包含新共享連結)
                    var getRequest = _driveService.Files.Get(response.Id);
                    getRequest.Fields = "*";
                    response = getRequest.Execute();

                    // 輸出父資料夾 ID
                    if (response.Parents != null && response.Parents.Count > 0)
                    {
                        += $"檔案位於資料夾:{String.Join(", ", response.Parents)}";
                    }

                    += "上傳成功且已設定為共享!";
                    += "共享連結:" + response.WebViewLink;
                }
                catch (Exception ex)
                {
                    += $"檔案上傳成功,但設定共享權限失敗:{ex.Message}";
                }

                return response;
            }
            else
            {
                += $"上傳失敗,狀態:{result.Status}、錯誤:{result.Exception?.Message}";
                return null;
            }
        }
    }
    catch (Exception ex)
    {
        += ex.ToString();
        return new Google.Apis.Drive.v3.Data.File();
    }
}
取得上傳檔案的詳細資訊:
(本段來源 5)
private string FormatFileDetails(Google.Apis.Drive.v3.Data.File file)
{
    if (file == null)
        return "無檔案資訊";

    StringBuilder sb = new StringBuilder();
    sb.AppendLine($"檔案ID: {file.Id}");
    sb.AppendLine($"檔案名稱: {file.Name}");
    sb.AppendLine($"MIME類型: {file.MimeType}");
    sb.AppendLine($"建立時間: {file.CreatedTimeDateTimeOffset}");
    sb.AppendLine($"修改時間: {file.ModifiedByMeTimeDateTimeOffset}");
    sb.AppendLine($"檔案大小: {(file.Size.HasValue ? (file.Size.Value / 1024) + " KB" : "未知")}");
    sb.AppendLine($"網頁檢視連結: {file.WebViewLink}");
    sb.AppendLine($"下載連結: {file.WebContentLink}");

    if (file.Parents != null && file.Parents.Count > 0)
        sb.AppendLine($"父資料夾: {string.Join(", ", file.Parents)}");

    if (file.Permissions != null && file.Permissions.Count > 0)
    {
        sb.AppendLine("權限設定:");
        foreach (var perm in file.Permissions)
        {
            sb.AppendLine($"  - {perm.Type}: {perm.Role} ({perm.EmailAddress})");
        }
    }

    return sb.ToString();
}
檢查資料夾下有哪些檔案與資料夾:名稱、ID、共享連結
var listRequest = _driveService.Files.List();
listRequest.Fields = "files(id, name, webViewLink)";
var files = listRequest.Execute().Files;

foreach (var filee in files)
{
    += $"檔案名稱:{filee.Name}, ID: {filee.Id}, 連結: {filee.WebViewLink}";
}
更新檔案
請參照:3
這裡就不寫了,參照篇寫得很詳細
*** 注意:更新檔案
- 一定要抓原檔案 id 去更新,否則會得到同名檔案共存。
- 更新檔案不會影響:共享狀態與連結、檔案 id
ref
UPDATE LOG
114. 05/05 開新文
115. 01/09 加入 服務帳戶 段落